The wifi.wavlink.com login is no longer applicable. Please use the IP address of the device to access the management interface. The new version of the software will also include an app management software.
In the early stages, wifi.wavlink.com was used as the management address for wireless routers, extenders, and mesh routers to assist users in memorizing the configuration IP addresses. However, due to various compatibility issues, this practice was abandoned. Nevertheless, products that have already been sold were not updated with a new management domain. If there are plans for future upgrades, this page will continue to follow up on this topic.

Underneath the socket of our WAVLINK wireless products, there is a label that displays a line of text: Default IP: 192.168.10.1. This address is the pre-set management IP address embedded in the product during manufacturing. wifi.wavlink.com is also mapped to this address to facilitate the management and configuration process.
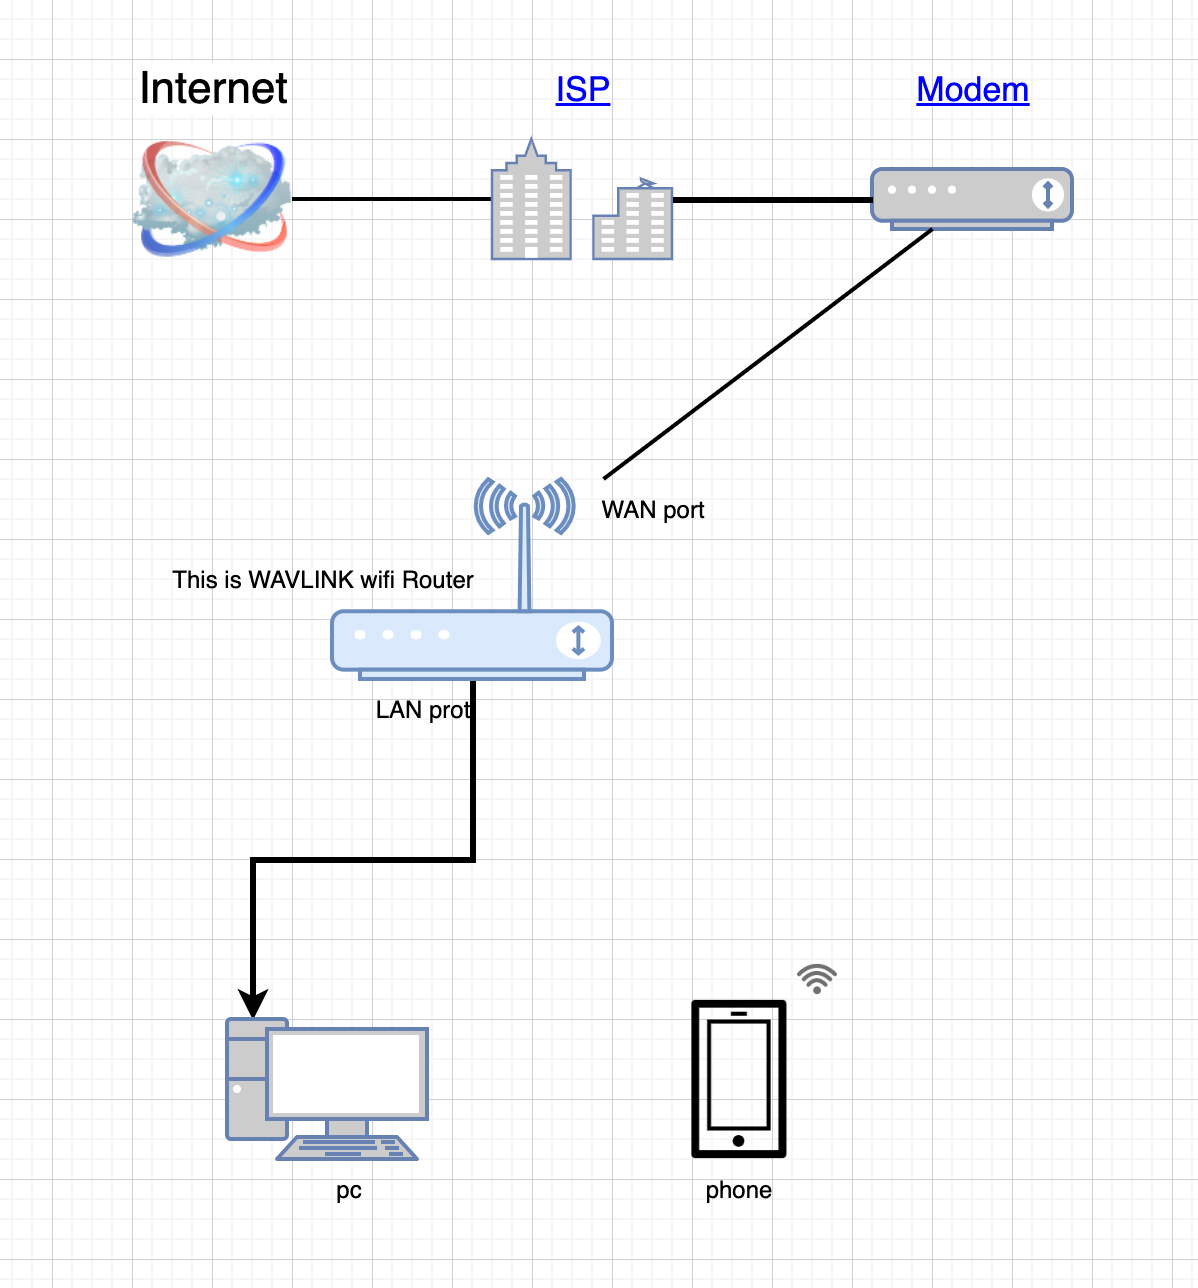
First, we ensure that the cable connections are correct. The WAN port should be connected to the upstream network, which can include an optical modem, switch, or LAN port of the upstream router. The LAN port of this device should be connected to a personal computer, including desktop computers and laptops with an RJ45 Ethernet port. It is important not to connect the LAN port to any other network port on the upstream network. If you do not have a computer or laptop with an Ethernet port, you can connect to the wireless signal of the WAVLINK product. Most of the WAVLINK wireless models have the prefix "wavlink" in lowercase letters by default and do not have a password set. If you have modified the wireless signal name, please connect to the updated signal name accordingly.
Next, we locate the web browser installed on the computer. In the address bar of the browser, type in "192.168.10.1" and press Enter. This will take you to the management interface. If you have previously modified the password for the management interface, please enter the password you set. If you don't remember the password, you may need to reset the device to factory settings before trying again.
If you cannot find the wireless signal even after powering on the device, please reset your wireless router or extender.
Tips:
DHCP (Dynamic Host Configuration Protocol) is a network protocol used to assign IP addresses dynamically to devices on a network. It automates and simplifies the process of IP address allocation, subnet mask assignment, default gateway configuration, and DNS server information for connected devices.
When a device connects to a network using DHCP, it sends a request to a DHCP server, which then responds with the necessary network configuration information. This eliminates the need for manual configuration of IP addresses, making it easier to manage large networks.
The DHCP server maintains a pool of available IP addresses and leases them to devices for a specific period. After the lease expires, the device can either renew the lease or request a new IP address. DHCP also allows for efficient utilization of IP addresses by reclaiming and reassigning unused addresses.
First step, unplug the Ethernet cable from the WAN port of the WAVLINK product. This helps minimize dependencies on potential faults.
Second step, restart the product, and then proceed with the above-mentioned steps to access the configuration management interface using the IP address.
Third step, it is recommended to configure the management address of the product to a less commonly used network segment within your multi-router network environment. For example, setting it to 192.168.20.1. Remember to set the DHCP address pool correctly as well. In this example, 192.168.20.2-192.168.20.100 would be a valid address pool.
Fourth step, plug in the Ethernet cable to the WAN port and verify the internet connection.
Reducing network complexity can often help solve problems. In complex network environments, there may be multiple routers, switches, subnets, and other components, which can make network configuration and troubleshooting more challenging.
Here are some suggestions to reduce network complexity:
Simplify network topology: Try to minimize the use of multiple-level routers or subnets. If possible, consider consolidating or simplifying network devices to reduce potential points of failure.
Reduce network components: Remove or minimize unnecessary network devices, switches, or extenders. Keep only the necessary equipment to create a clear and streamlined network structure.
Plan IP address allocation: Properly plan IP address allocation to avoid conflicts and confusion. Use subnet masks and gateway settings to ensure correct network communication.
Optimize network security policies: Ensure that network devices have appropriate security settings and restrict unauthorized access to the network. This helps reduce potential network interference and intrusions.
Implement centralized management and monitoring: Use a central management and monitoring system to oversee and manage the entire network. This allows for quick identification and resolution of any potential issues.
By reducing network complexity, you can improve network stability, reliability, and ease of troubleshooting.
Get the Scoop First
Subscribe to our official website to receive exclusive first-hand news and stay up-to-date on our new product releases and promotions!